
Module 3: The AI Application Development Pathway
You can now proudly say that you’ve built some AI models! If the process was a bit overwhelming, that’s normal. You might be wondering what steps you’d take if you had to do this without all the scaffolding provided by tools like Teachable Machine. Thankfully, most AI modeling follows the same basic arc. The steps presented in this module will hopefully seem familiar after the last module’s exercises, but we will dive deeper into each process to help with the whats, hows, and whys of creating your own AI models.
Topics
Objectives
By the end of this module, students will be able to:
- Define a problem that an AI application can address.
- Gather appropriate data that can be used to train an AI model.
- Choose an appropriate AI algorithm or model for a specific task.
- Train an AI model.
- Evaluate the performance of a trained AI model.
- Deploy an AI model into production.
Watch
 Video: AI Application Developtment Pathway
The AI Application Development Pathway
In this module, we will be looking at AI application development. Regardless of your model, the development pathway follows the same fundamental steps.
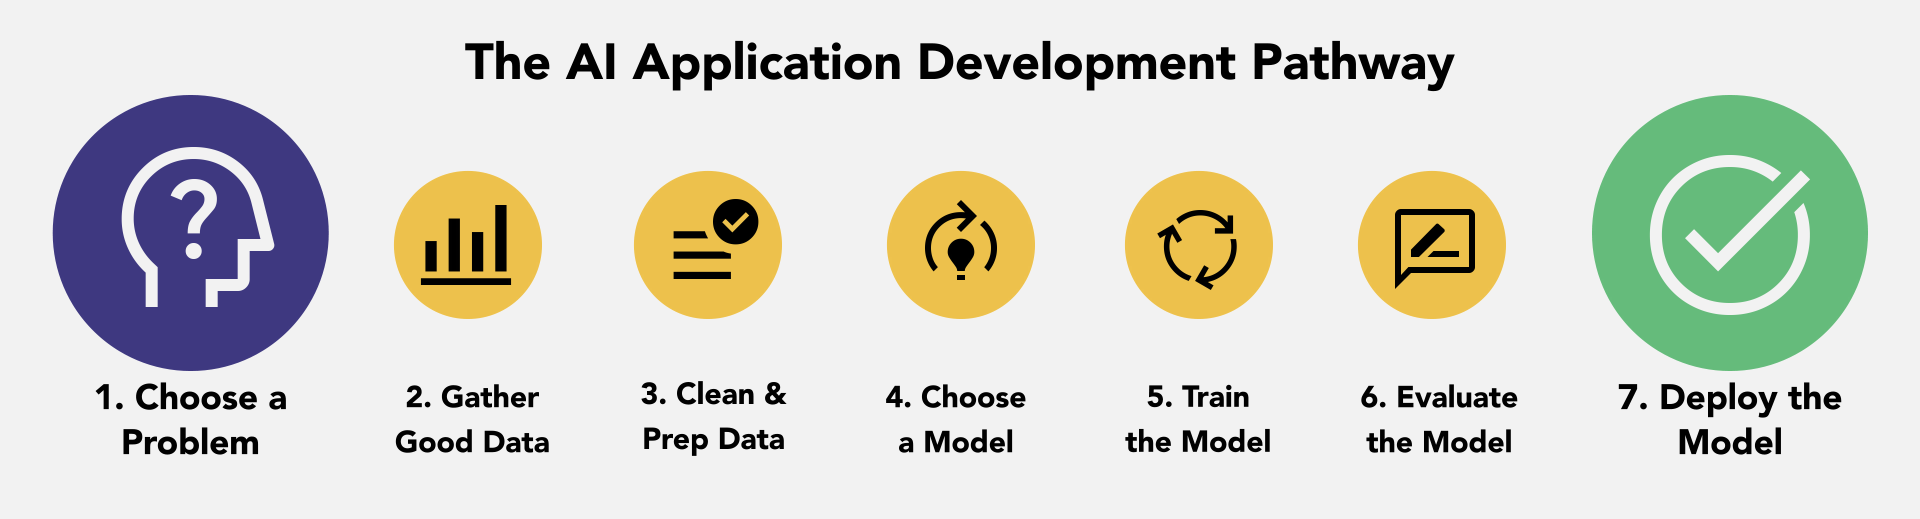
Those steps are:
- Choose a problem to solve. The first step in developing an AI model is to choose a problem to solve. This could be anything from classifying images to predicting customer behavior.
- Gather data. Once you have chosen a problem, you need to gather data. This data will be used to train your model. The more data you have, the better your model will be.
- Clean and prepare the data. Once you have gathered your data, you need to clean and prepare it. This means removing any errors or inconsistencies in the data. You may also need to normalize the data so that it is all on the same scale.
- Choose a model. There are many different types of AI models that you can choose from. The type of model you choose will depend on the problem you are trying to solve.
- Train the model. Once you have chosen a model, you need to train it. This is done by feeding the model the data you have gathered and prepared. The model will learn from the data and improve its accuracy over time.
- Evaluate the model. Once the model has been trained, you need to evaluate it. This is done by testing the model on a dataset that it has not seen before. The evaluation will help you to determine how well the model performs on new data.
- Deploy the model. Once you are satisfied with the performance of the model, you can deploy it. This means making it available to users so that they can use it to solve problems.
Seems easy enough! Let’s do it ourselves:
 1. Choose a problem to solve. As we mentioned in Module 2, any problem where there is some pattern in the data can be solved to some extent by AI.
Things to consider when choosing a problem:
- The availability of data. You need to have access to data to train your model. If you cannot find data for your problem, you will not be able to build a model.
- The feasibility of the problem. Some problems are simply too complex to solve with AI (too many variables or without a straightforward way to be modeled). Ensure your chosen problem is feasible before you start working on it.
- Consider what problems you’ve encountered that might be solvable with AI. For the sake of consistency, we’re going to cheat a bit, and I’m going to give you a problem so that we’re all on the same page for this course.
- For now, we’re going to pretend that we’ve been tasked to categorize people’s food choices in a cafeteria. We will build a model that recognizes junk food vs healthy food from camera footage to evaluate people’s choices.
 2. Gather data. Probably the most challenging step in AI development is gathering the data to train and validate your model.
Here are some things to consider for data gathering:
- The type of data. The kind of data you need will depend on the problem you are trying to solve. For example, if you are trying to build a model to classify images, you will need a dataset of images with labels.
- The size of the dataset. The more data you have, the better your model will be. However, it is important to note that more data also means more time and resources to gather and process it.
- The quality of the data. The quality of the data is important. If the data is noisy or inconsistent, it can negatively impact your model’s performance.
- Data can be gathered yourself, found in public repositories, or purchased from companies. Each of these approaches has tradeoffs.
What kind of data do you think we need for our junk food vs. healthy food model to be able to recognize it from video footage?
Let’s take a few minutes to gather some samples!
 3. Clean and prepare the data The data you gather will have to be fed through a mathematical algorithm and, as such, must be formatted so the algorithm can “understand.”
Tips for preparing your data:
- Identify and remove errors. This includes typos, missing values, and inconsistent data (outliers).
- Scaling the data. This means modifying the data values to be all on the same scale. This can help to improve the performance of your model.
- Feature engineering. A feature is an input variable into a model. Think of this as a column of data—temperature, for example. Feature engineering is the process of creating new features from your existing data. This can help improve your model’s performance—the square of the temperature, for example. Feature engineering is a complicated process, but here’s a quick example: Suppose you are trying to build a machine-learning model to predict the price of a house. You have a dataset of houses, each with several features, such as the number of bedrooms, the number of bathrooms, the square footage, and the location of the house and nearby schools, parks, and other amenities.
One way to improve your model’s performance is to engineer new features from the existing ones. For example, you could create a feature called “total living space” by adding the house’s square footage to the garage’s square footage. You could also create a “walkability score” feature by using the house’s location to calculate how close it is to schools, parks, and other amenities.
For the data we gathered in Step 2, what might we have to do to prepare it for processing?
 4. Choose a model. This part can be tricky in that there are many kinds of models! Already having data will significantly reduce the number of models to choose from (some models only take tabular data, others sound files, etc.) An important consideration for what kind of model to choose involves whether or not your data is labeled. Labeled data is essentially a set of already-solved problems that tell the model what it should look for. If you recall the well-known equation y = mx+b (for defining a line), the “y” would be your label. Having x-rays of bones, some labeled broken and others labeled unbroken, tells the model what patterns it should associate with which labels.
Here is a summary of the three learning types:
- Supervised learning: This type of AI model learns from labeled data. For example, you could train a supervised learning model to classify images of cats and dogs by providing labeled data that includes images of cats and dogs with their respective labels.
- Unsupervised learning: This type of AI model learns from unlabeled data. For example, you could train an unsupervised learning model to cluster data points by providing it with unlabeled data that includes data points that are like each other.
- Reinforcement learning: This type of AI model learns by trial and error. For example, you could train a reinforcement learning model to play a game by providing a reward for winning and a penalty for losing.
It’s also worth noting that you’ll rarely “choose” one model. Ideally, you’ll select a few that work with the kind of data you have, and you’ll try them all to see which gives you the best application.
Which learning type do you think we’ll be using for this junk vs healthy food recognizer?
Which model type should we pick to help us sort different food categories from video footage?
 5. Train the model. This is probably the easiest step… if it works. There isn’t much to say here at this step except that it’s possible that due to the hyperparameters (model settings that you adjust, like learning rate or the optimizer used) you choose, or the dataset you’re using, or the compute resources available to you, your model may fail to converge (a fancy word for reaching a solution to your problem). If that’s the case, you’ll have to start troubleshooting.
One other important point: the tool we’re using is taking our dataset and splitting it up for us (85% for training, 15% for validation). This is a necessary step for the development process, and one that isn’t usually automatic!
Here’s where we’ll train our models. Fingers crossed!
 6. Evaluate the model. Remember the Under the Hood stuff from Module 2? This is where that comes into play.
Here is how you can use metrics to fine-tune your model:
- Accuracy per Class: This metric measures the model’s accuracy for each class. This can help identify with which classes the model is struggling. For example, if the model has high accuracy for most classes but low accuracy for one class, this suggests that the model may not be generalizing well to that class.
- Confusion Matrix: This matrix shows the relationship between predicted and actual classes. This can help identify specific types of errors that the model is making. For example, if the model predicts a class with high confidence but the actual class is different, this suggests that the model may be overfitting the training data.
- Accuracy per Epoch: This metric measures the model’s accuracy at the end of each epoch. This can help identify if the model is improving or plateauing over time. If the accuracy is not improving, the model may need more training data, or the hyperparameters may need to be adjusted.
- Loss per Epoch: This metric measures the loss of the model at the end of each epoch. This can help identify if the model is converging (approaching a solution) or diverging (going away from a solution). If the loss is not decreasing, the model may not be able to learn from the training data, or the hyperparameters may need to be adjusted.
You may be curious about how accurate our model needs to be. That’s up to you and the requirements of your research question. For our course, we will aim for at least 90%, high but achievable.
Should you add more data to improve your model’s accuracy? Tweak your hyperparameters? Both? Why?
 7. Deploy the model. A model nobody else can access or use isn’t much benefit. Plus, sharing your model and model implementation code is important to adhering to open science standards. In some cases, you might even want to deploy a model as part of an app or end-user tool, but more often, you simply want to make your model available to other researchers. Your model can be shared with the public via external code- and model-hosting platforms or with others on the same computing system. It’s outside the scope of this course to deploy your model on other platforms, but it is important to know that this is possible and will often be a necessary step in the process.
And that’s it, the AI Application Development Pathway!
Back to course home or on to Module 4: A (Very) Brief Intro to AI Ethics
