Step 3: Open AI Thoughts Repo and Add Notes (HPC)
Now that you have connected your GitHub account with either HiPerGator or Google Colab, you can make changes to files in those environments and have those changes appear in GitHub.
- Revisit your ai-thoughts repository created in step 1 above. You can log in at https://github.com/, and it should be listed on the left-hand side of the page under Top Repositories. If not, add your GitHub username and the repo’s name (ai-thoughts) to the URL.
- Clone your “ai-thoughts” repo, this time using the SSH link now that your keys have been configured:
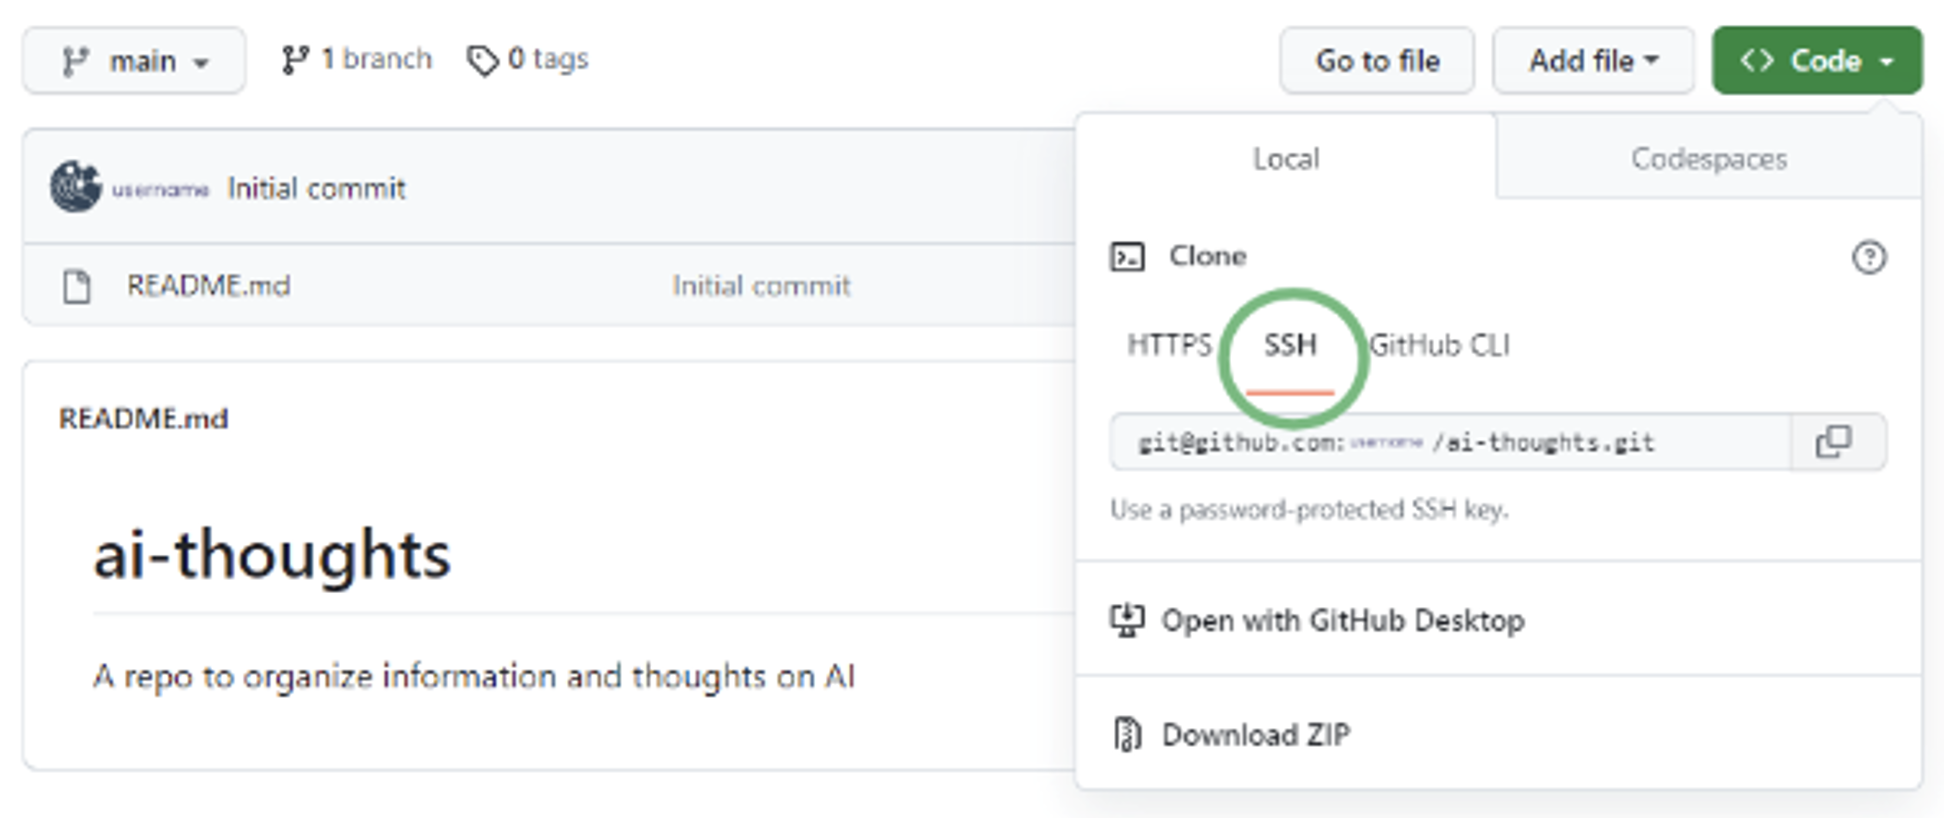
- Click the green <> Code button.
- Make sure the SSH button is selected (not the HTTPS),
- Copy the line of text in the box using the copy button.
- Connect to your Jupyter session or start a new one.
- The last cell of the 02_git_configuration_HiPerGator.ipynb notebook, created a symbolic link to your blue directory called “blue_group”, where “group” is the name of the group (or account) you used when starting Jupyter.
- Navigate to that directory; you should have a folder with your name. If not, create a folder with your name using the New folder icon to the right of the large blue + button.
- Navigate to your folder.
- As you did in Module 1 of this course, click on the git tab (third button down on the left) and then click the blue “Clone a Repository” button.
- Now paste the link to your ai-thoughts repo and click “Clone.”
- Click back on the File browser tab (top icon on the left that looks like a folder)
- Navigate into the ai-thoughts folder—this is the local copy of the repository.
- Open the README.md file.
- A README file is used to provide information about the repo. Every repo should generally contain a README file.
- The “.md” file extension means that this file is written in Markdown—the same syntax used in the Markdown cells of Jupyter notebooks (Markdown has become very popular as a lightweight text formatting tool).
- Let’s change the title of this file to something more interesting, like “My Amazing Thoughts and Resources on Artificial Intelligence.” (remember the title is the line at the top with the level 1 header indicated by the single #)
- Next, add a level 2 header and a list of things you want to do with AI. Here’s an example:
          ## Things I want to do with AI

          * Have fun
          * Take over the world
- OK, let’s save these changes.
- Click back on the git tab.
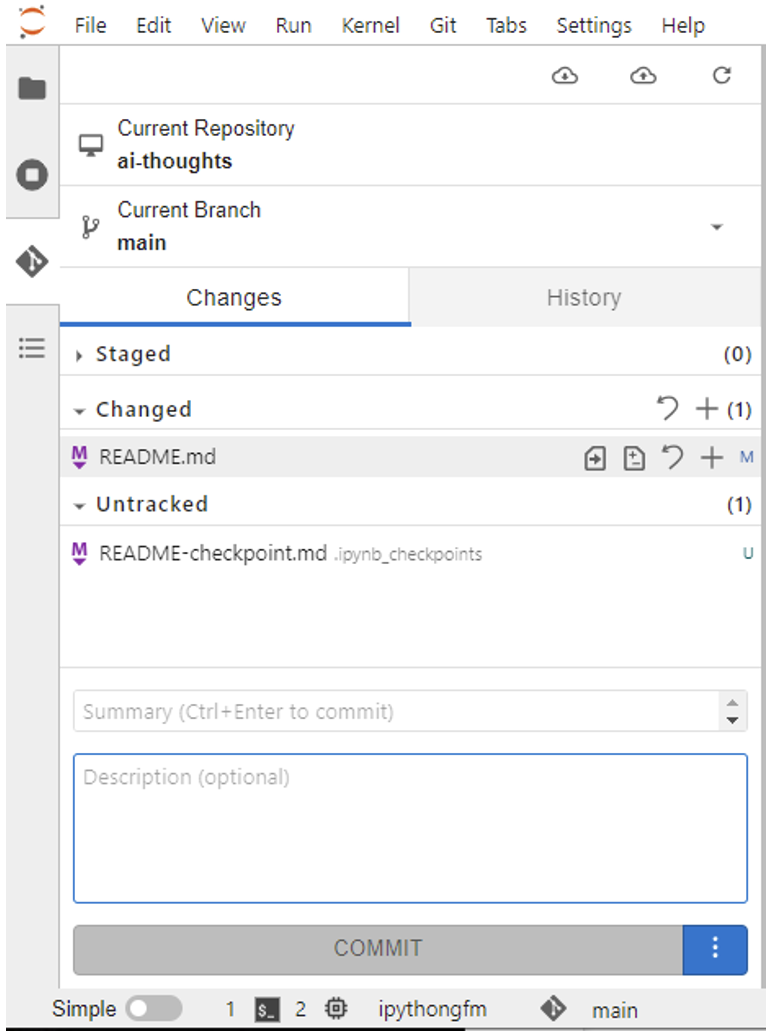
- We should now see that the README.md file is listed in the “Changed” section, indicating we have made changes. This shows changes made in the “working” part of git that have not yet been staged.
- Mouse over the README.md file, and you will see some icons, including a “+” appear.
- Click the “+” to add the README.md file to the “staging” area. This tells git that you want to track the changes made to the file.
- In the Summary box near the bottom, type a commit message: something like “Add initial goals.” Commit messages should describe what changes you have made and should be relatively short (40 characters)—you can optionally add a longer description if you want.
- Click the Commit button.
- The cloud icons at the top of the git tab have a down arrow to pull changes from the remote repository (GitHub.com) and an up arrow to push changes to the remote repository. After making a commit, you should have an orange dot on the push button, indicating that you have changes that you can push to GitHub. Click the push button.
- You may also notice the README-checkpoint.md file. Jupyter creates checkpoint files to restore a file if something goes wrong. Generally, you should ignore these files and not add them to the repo.
- Return to your repo in GitHub and click refresh on the page. You should now see the new version of your notes on AI! Congratulations! You have made your first git commit and push!
This is the typical git workflow you will use throughout the Practicum AI series and in real coding work.
- Create a repo on GitHub—it may be empty or from one of our templates, as you did in Module 2
- Clone that repo to an HPC, like HiPerGator, or work on files in Google Colab
- Add and commit changes and Push those changes to GitHub (one step in Colab)
This keeps everything in sync and allows you to have your code where you can share it with others, collaborate, and more.
Git and GitHub have a lot more features, and GitHub has some great tutorials to help you learn how to use some of them. We encourage you to explore, but what you have done so far will get you a long way!
Return to the Module 3 page to continue with the next step.
